Hello all!
I have decided to create a new blog. I want to thank all of you who followed this one. I really appreciate it. If you would like to continue to follow me, my new blog can be found here.
Have a wonderful day!
Cara

Friday, November 28, 2014
Tuesday, July 29, 2014
DIY - Peerless Water Color Palette
Who hasn't noticed how popular water colors are right now? Everyone is using them and it's actually a trend that I jumped right on…mainly because I love to paint! Now…to be honest I am no Picasso. I just like to swirl the color around with the paint brush and see what happens. (And maybe color a stamped image.) And these Peerless water colors are gorgeous!
I have had a lot of fun using these water colors but I had some issues painting with them in their original packaging so I decided to create my own palette for these paints. Please check out what I made in this video.
Once I had that done, it was much easier to use the paints. I was enjoying it so much that I sat down and created two new cards. This first one shows you that gorgeous blue color that I talked about in the video.

Here's a close up of those beautiful colors...

I was a little worried that the dark color I used on the flowers wouldn't work but I think it's a great contrast with the light blue sky.
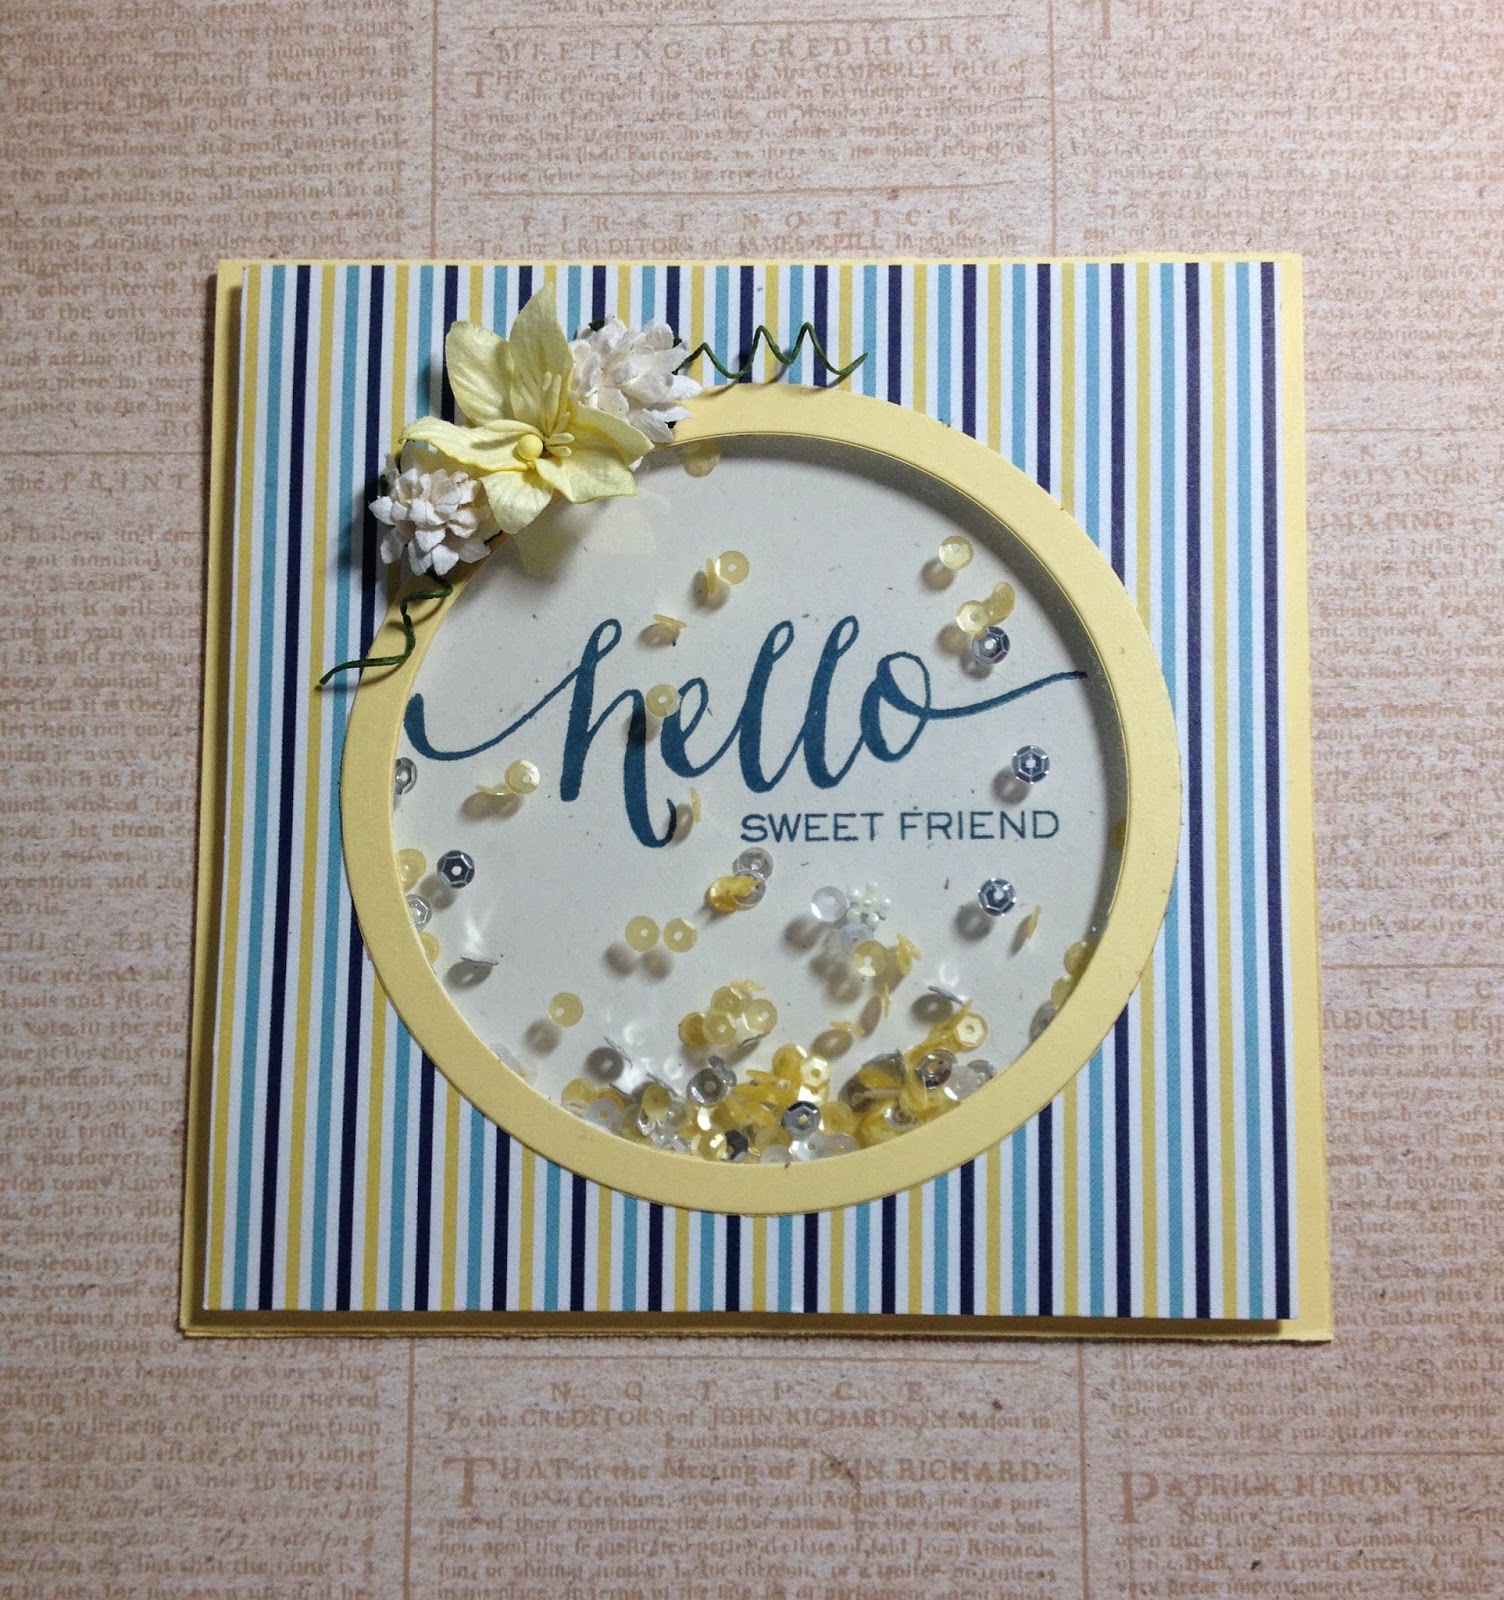
Then I decided to try a completely different color combo…

I painted on some water color paper first, creating that background using the yellows, oranges and a little pink that I have…then I die cut the tag and completed the card. That fantastic die is from Pretty Pink Posh and can be found here if you are interested. (It's also available at Ellen Hutson and Simon Says Stamps…two of my fave online stores.) I should also mention that the sequins used in both these cards are also from Pretty Pink Posh. :)
Hope you enjoyed the cards and are having a wonderful day!
Sunday, July 6, 2014
Card Share
Happy Sunday everyone! I hope you all had a fantastic holiday weekend! We had a fantastic couple of days here in Alaska…gorgeous blue skies with white fluffy clouds and warm temperatures. We (meaning the hubby) grilled some yummy steaks and had a great weekend…until today. Woke up to overcast skies and rain. I am taking it as a sign that I need to get back into my craft room.
Before I get started on something new I thought I would show you some of the cards I created using the card kit from Simon Says Stamp for July. I have uploaded a couple of videos on my Youtube channel. You can check those out here and here.
I have a few other cards to share as well…I am going to start with my least favorite. I was just playing around with the stickers.

I thought I would see how quickly I could throw a card together…and it was fast. I am just not too impressed with the results, which is all me and not the products. The paper and stickers are adorable!
So then I thought…let's try making one with just stamps.


Before I get started on something new I thought I would show you some of the cards I created using the card kit from Simon Says Stamp for July. I have uploaded a couple of videos on my Youtube channel. You can check those out here and here.
I have a few other cards to share as well…I am going to start with my least favorite. I was just playing around with the stickers.
I thought I would see how quickly I could throw a card together…and it was fast. I am just not too impressed with the results, which is all me and not the products. The paper and stickers are adorable!
So then I thought…let's try making one with just stamps.
This is truly a one layer card. No bling, no embellishments, no dimension…simply stamped…and I really like it. I find I am happiest when I am able to do some stamping on the card.
Next I created this embossed card which was the inspiration for the video.
That gold ink really made the card…here's a close up…
This one is probably my favorite…it was simple to make but is so pretty!
And lastly, I looked around at all the scraps on my desk…and trust me…there were a ton…and instead of cleaning up, I decided to create one more card.
I hope you enjoyed all the cards! Happy Crafting!
Tuesday, July 1, 2014
Stencil Printing…Inspired by Tim Holtz
Hello again! Several weeks ago I was checking out some of the crafty blogs I like when I stumbled across one by Tim Holtz. And I loved it! If you want to check it out, you can find it here.
So I tried it out…you can see some of my results in this video. I had such a blast doing this that not only did I make some tags (which you can see here) but I also made a few cards.

I think this stencil printing makes a gorgeous background. Here's a close up…

Love how this looks! I also did a similar card using a different color card stock.

Isn't it pretty? This is the same technique I used to make one of those Father's Day cards that I showed in a previous post.
How about you? Are you trying some new crafty technique?
Have a great day! Happy Crafting!
Monday, June 30, 2014
Continuing with Copics
Hi there! When I was a child one of my favorite things to do was to color. I loved coloring books (Barbie ones were my fave.) and drawing. I would even draw a huge scribbly thing and color in the various shapes it created. I never had any true talent as far as sketching goes but there was something so relaxing about just sitting down and coloring. I even took crayons and coloring books to college. There was no better way to relax when studying for a big exam than pulling out my coloring book (which may have still been Barbie) and crayons.
So years ago when I started getting interesting in Copics I was so excited! I loved the way they colored and couldn't wait to get started. But when I started to use them I realized they weren't as easy to use as I thought…at least not for me. I had colored some images that I was happy with like…


So years ago when I started getting interesting in Copics I was so excited! I loved the way they colored and couldn't wait to get started. But when I started to use them I realized they weren't as easy to use as I thought…at least not for me. I had colored some images that I was happy with like…
…this one.
Or…
…this one. But I still didn't think I was really "getting it." It wasn't one of those things that I could just do a couple of times and get…if you know what I mean. I decided that if I wanted to get better at coloring, that's what I was going to have to do…practice.
So I got out some of the Saturated Canary stamps that I have been too afraid to use.
I cut some 2 inch x 2 inch squares out of the Blending Card by X-Press It. Since I want to focus on skin and hair coloring first, I stamped the top of the stamps on the squares like this…
…so what do you think? Am I ready or what?
So my plan is to practice and document my progress right here. I will keep you all posted!
Happy Crafting!
Saturday, June 21, 2014
Sequins, sequins, sequins
Hi everyone! I hope you are having a fantastic weekend! I have been trying to find my missing crafty mojo and decided some sequins might help. So I put together a few cards and did a quick video.
Here's how I finished the card in the video…
I kept it very simple…it's really all about the sequins. Here's a close up…

Love those Pretty Pink Posh sequins! And since I was still feeling the sequins, I made one more card using those fun star dies from Paper Smooches that I showed you in the video.

This one might be my favorite. I love the color of those sequins from Pretty Pink Posh and the splatter from the Mister Huey's. I think it's a really fun card. Here's a close up…

You can find all of these wonderful sequins and more here at Pretty Pink Posh.
Enjoy the rest of your weekend! Happy Crafting!
Tuesday, June 17, 2014
My Father's Day Cards
Hello all!
I know Father's Day has already passed but I wanted to quickly share the two cards I made for my husband. This one was from me…

and this one I made for my daughter to give to him (she's not a card maker)…

(There will be an upcoming video showing how I created this background.)
Luckily, his gift this year was super simple because we just got a Cabela's here in Anchorage a few weeks ago. Got him a gift card and he's good to go!
Enjoy the rest of your week!
Sunday, May 4, 2014
Mama Elephant Challenge
Hello there…hope you are all enjoying your weekend!
I thought I would share a card that I created for the challenge over at Mama Elephant. Here is the inspiration photo, courtesy of www.raymondhom.com.

And here's what I created…

I actually used stamps from three Mama Elephant stamp sets. The sequin and star stamps are from Confetti, the doily-like stamp is from Filigree and the sentiment is from Up and Away. I also used the Femmes Frames dies which are my FAVORITE dies! I don't even put those two away. They have what may be a permanent place on my desk.
I am really pleased with the way it turned out. If you are interested in checking out the challenge or all the other gorgeous creations, they can be found here.
Have a wonderful week!
Monday, April 28, 2014
My First Shaker Card!
Hello all! I hope you are having a great week!
Well…technically this isn't my first shaker card. It's just the first one I am going to show you. :) I had a couple other ones that I worked on but I honestly wasn't happy with the results. I watched a ton of videos but until I actually tried putting one together…well, let's just say I learned a lot. I plan to do a how-to version of what works for me in a few days.
I do have one I want to share…please remember it's my first attempt.

And here's a bit of a close-up…

Not too bad for a first attempt, right? I am going to make a very similar one in the how-to video. (And I hope to have a few others to share.)
I think these shaker cards are really adorable and there are ton of options. If you want to see more shaker cards, head over to the the Pretty Pink Posh blog and check out the shaker card blog hop which can be found here.

So many awesome cards to see! Everyone did such a fantastic job!
Happy crafting everyone!
Saturday, April 19, 2014
Honey Bunny Mini Easter Cards
Happy Easter everyone! I hope you are enjoying your weekend! I want to share the mini cards I created to go with some simple little treat bags I made for friends.
It was a perfect excuse to pull out some of my new Mama Elephant stamps! I grabbed my favorite one…Honey Bunny…and got busy.
I wanted these cards to be relatively small so I cut some squares of paper which were 2 x 2 inches. I stamped on the images I wanted to use and got busy coloring with my Copic markers. I added a little bit of pattern paper and used some kraft card stock from Papertrey Ink as the card base.
I think they are pretty darn cute…and that stamp set is stinkin' adorable! Absolutely love it!
You can check out all these adorable stamps right here.
Happy crafting everyone!
Saturday, April 12, 2014
Possibilities..
Hello everyone!

I have a small new Moleskine sketchbook that I have been wanting to start using for my art journal. (I showed it in a haul video on my YT channel/AKCaraboo.) It's 3 1/2 x 5 1/2 inches. Small by many people's standards for an art journal but I am finding myself liking smaller things like this lately. The larger pages of other journals seem somewhat daunting to me. Here's what it looks like...
I have been thinking about cracking open this journal for a couple of weeks but have been stuck thinking about the possibilities...what I want it to be, what types of things I want to try or do in it…and so on. But finally I decided to just DO IT. So tonight…with my daughter and hubby both out…I am ripping off the plastic and playing! Can't wait to see what is created…and I will share it with you from time to time.
If you have been waiting to do something…try something new...just go for it. We over-think things so much…we need to just learn to enjoy the process. So that's what I am going to do…stop thinking and start playing!
Happy Crafting Everyone!
Monday, March 24, 2014
Hello all! I am back again! Yeah me…posting again! I am back to share a recent project with all of you. I have been crafting and creating for years but much of what I make I give away to friends and family. I decided I need to start creating some things to put up around my house. I was looking through my stash of goodies to alter when I came across some mini canvases. I decided to use some of them to create some magnets for my frig. I pulled them out and laid them down to figure out which layout worked best.


Once I was happy with the layout of the canvases I laid out the stamps to determine where to place them.
I placed them face down because that is how I would be stamping them onto the canvases. Once that was done, I picked a stencil and began applying some molding paste to each of the canvases. Before doing that I laid the stencil down with the stamp on each canvas to determine where I wanted to apply the molding paste.
Then I moved the stamp and applied the molding paste. Once I had added that to all the canvases and let it dry, I applied lots of color. I sprayed, applied gelatos, sprayed again…added gesso…and so on…until I was happy with the background. Then I stamped the images using Archival Ink…and if I am truthful…added a bit more color and gesso. I also darkened the parts that were stenciled…then added some gesso. I kept "tweaking" it until I finally had to walk away. When I came back (the next day) I decided it needed some black sequins. Then I added some magnets to the back and called it done!
What do you think? Here are a couple of close ups…
I really happy with them and love seeing them on my frig every day! Have a great day!
Wednesday, March 5, 2014
Derwent Inktense Pencils & Unity Stamps
Hello all! I know it's been a while…I hope you are all doing really well in this not-so-new-any-more year! I have been busy crafting and I wanted to share one of my newest crafty loves…Derwent Inktense pencils! They are water-soluble goodness! I actually have had these pencils for quite a while but I really hadn't tried to use them. So I pulled out one of my favorite Unity stamps…Jacqueline girl and stamped her on watercolor paper (140 lb cold press). (If you try this, make sure to use waterproof ink.) I then colored the image using the Inktense pencils.
Here's a quick video on how I did it:
This technique was so much fun…I think these pencils are a great alternative to Copic markers. (I love my Copics but they are a bit expensive and take practice.) I liked them so much I went out and got some more AND I ordered a small set of the Derwent Graphitint and Derwent Metallics (both water-soluble) to try!
Here's how the card turned out:


I really like the watercolor feel the image has after using these pencils. I hope the video shows you how really simple this to do and you give this technique a try.
Happy Crafting!
Subscribe to:
Posts (Atom)
Popular Posts
-
 Hey, everyone! I'm here with The Greeting Farm today and I'm happy to report that no, it definitely was NOT a DREAM! That...
 -
 Hello everyone! Do any of you remember when The Greeting Farm put out a call for people to be involved in a secret mixed media project? We...
 -
 Hi crafty peeps! Hope you are all having lots of crafty fun...I have been...making these rosettes! I love them! I can use them on cards, la...